Wednesday, November 16, 2016

Assignment 11 Still Life


Photograph a Shiny  object and define its shape and characteristics by use of it reflective qualities.


 Photograph a transparent object and define its shape and characteristics by using its transparency.

Lesson 11 Still Life


Live View with EOS Utility and Lightroom
Using Canon EOS utility has a great advantage in Still Life in that you can see in real time how you light is looking on the object.  It is especially useful for placing reflectors and gobos.  I have made a list of setting in order to use the Canon 5DMII with Live View in the EOS utility with Lightroom.

There are two important settings on the Canon that must be made:
1.       Go to the Menu with a wrench and two dots. 

2.       Go to Live View/Movie func. Set

3.       Set Silent shoot. To Disable.  (Must have this set so that the flash will fire when we make a picture with Live View on.  I didn’t know about this setting in our demonstration and that is why the flash wasn’t firing)

4.       In Menu go to the camera symbol and scroll down to C.FnIV Operation/Other and go to option 1 and set on #3 AE lock/Metering + AF start.  This will set the focus start to the button on the camera with AF-ON and will disable the shuttle button from trying to focus.

Now open the Canon EOS utility.  You might have to open it in applications.  You should have the camera tethered and on at this point.
1.       Click on Camera settings/Remote shooting.  You should see the remote shooting screen with all you camera settings.  The settings can be changed on this screen.

2.       Next go to the Preferences Screen

a.       Basic Settings only check the Show main window button.

b.      Destination Folder change the folder to Watched Folder on the desktop and keep everything else unchecked.

c.       File Name  Do not modify

d.      Download Images  set to Images not yet downloaded

e.      Remote Shooting check box for Save also on the camera’s memory card

f.        Linked software None

g.       OK
Now open Lightroom and make the following changes:
1.       File®Auto Import®Auto Import Setting

2.       Set the Watched folder on the desktop

3.       Set the destination folder to somewhere not on the desktop.

4.       File Naming set to Filename.

5.       Make sure the Enable Auto Import is checked

6.       OK


Go back to the remote shooting screen and press the Set-up menu then press the Live View/Movie func.set. button.

1.       Under LV func. Setting check Stills only

2.       Under Screen settings click Still display

3.       OK 

Now click Live View shoot button

1.       Set the white balance to Auto (give a better preview image and does a decent job with the capture)

2.       Play with the focus setting and see what works.

3.       Take a picture with the remote button and make sure the flash is firing.

How to Capture a series of images using different lights:

Use the PocketWizard MultiMax set to transmit.
 Press the menu key and then press A:Advanced Menu
 Press D:Speedcycler. 
Set the channel to any number that is 17 or higher.  
Press A-D depending on the number of separate lights you want to capture.  
Using the Profoto 1200R train it to be the number set on the transmitter and one of the letters starting with A. You can also use the PocketWizard III to set channel numbers 17 and above and one of the 4 letters. 
Now each time you press the MultiMax it will set off the lights in sequence and then repeat the sequence over and over.

Wednesday, November 9, 2016

Assignment 10 Canon Transmitter ST-E3=RT and 600EX-RT Flash

Work in Groups in the Studio for this Assignment.  Each member of the group should make a portrait using 3 Speedlites from different directions, controlled manually from the Transmitter attached to the camera which is also set on manual.  Each member of the group should make a unique lighting setup.  You can modify the light coming from the 600EX to a broad source of light by using diffusion, umbrella, soft box or bouncing off a wall or card. You can also use the light directly.


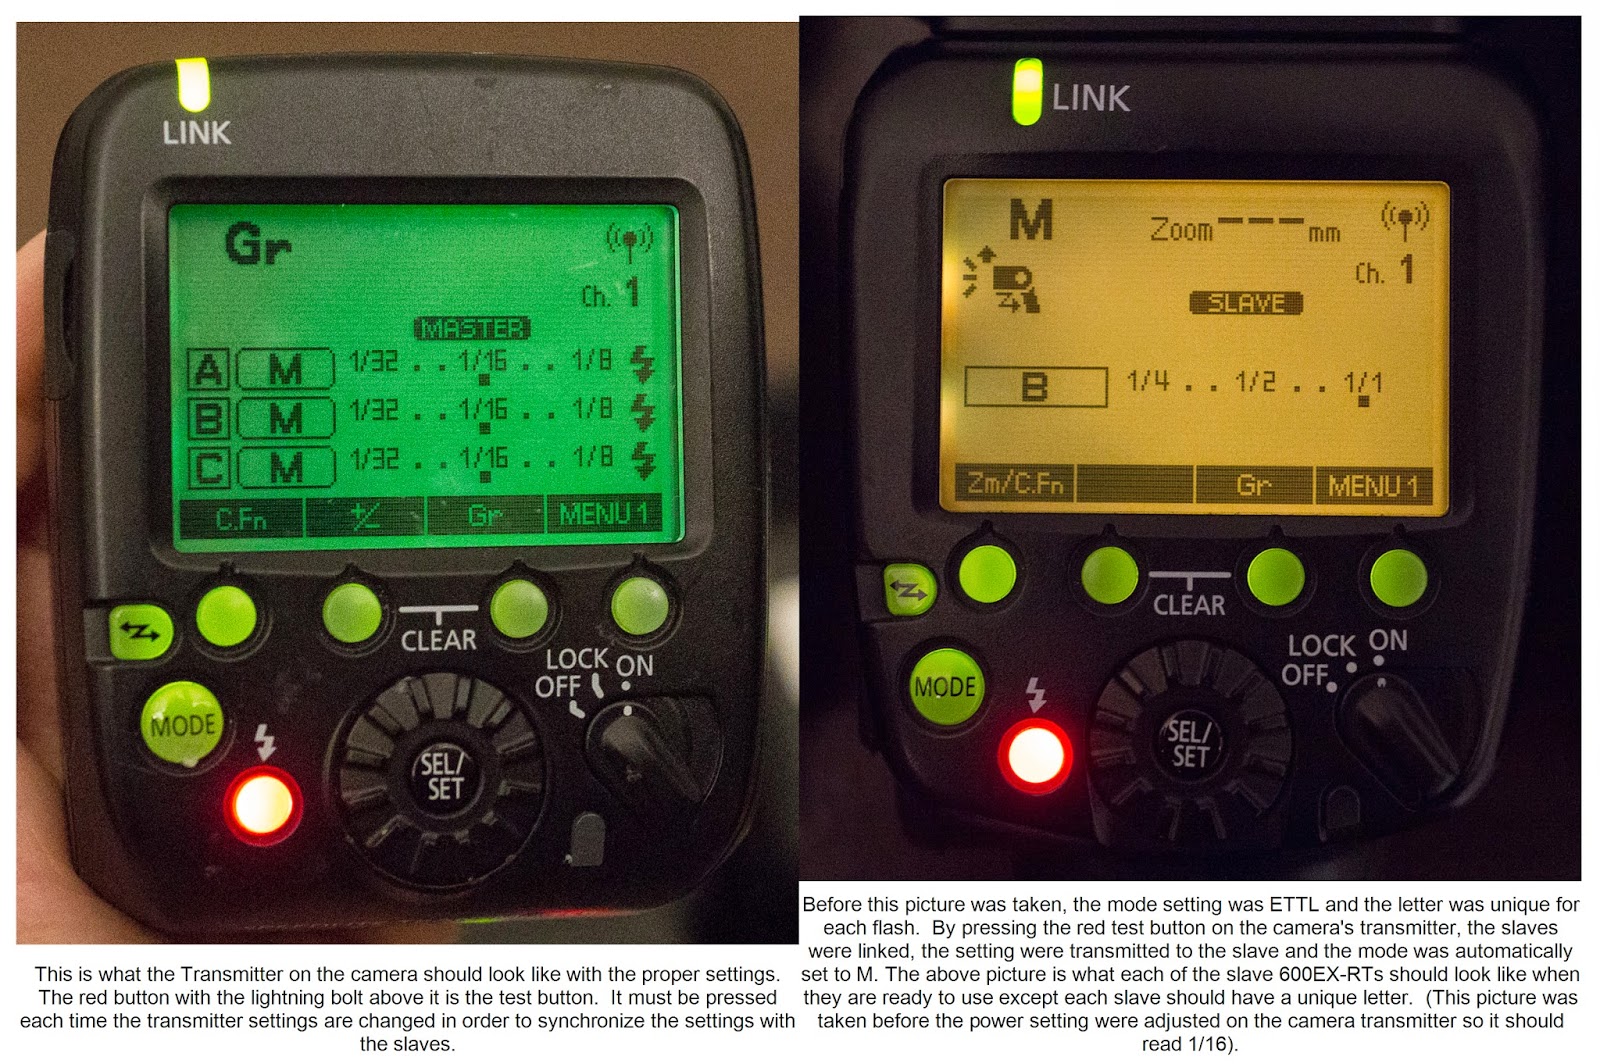
 Set the Master to GR and set A, B, C and D (Optional) to M.   The three slaves will set themselves to M after the test button on the transmitter is pressed.  Use the ST-E3-RT to adjust the setting manually.


Take a picture of the ambient light in the room at the fstop and shutter speed you will be using.  It should come out black. Post this picture with it's settings.

Post the the progression of images (ie one light, 2 lights, 3 lights etc) with final exposure for each shot (should all be the same)

I realize this is an ambitious assignment and that you might not have time for each member of the group to accomplish their own unique version.  Do the best you can and good luck.

Lesson 10 Canon Transmitter ST-E3=RT and 600EX-RT Flash


Bruce Dorn's Introduction to Canon's Speedlite's system click here


Quick Guide to Speedlite Transmitter ST-E3-RT Setup click here

There is a way to adjust the Speedlite setting on the 5DMIII.  Check out where to find Flash Function Settings in the 2 pages from the camera manual.  You might find it easier to make adjustments:

Wednesday, November 2, 2016

Assignment 9 Dedicated Flash


Here is how to change the flash sync speed in Av mode:

Use direct flash on camera Aperature Priority (Av) setting at 1/200 sec shutter speed
Use direct flash off camera Aperature Priority (Av) setting at 1/200 sec shutter speed
Use flash fill Aperture Priority Auto shutter speed
Use flash with modifier (Bounce card, bank or ceiling) Aperature Priority (Av) setting at 1/200 sec shutter speed.

Label your best result from each of the 4 techniques, write down your camera settings for each photograph and post them separately.


Read the two pages (posted  in the Lesson 9 section) from the Canon 580EXII or the Canon 600EX manual to help understand what the settings mean

Lesson 9 Dedicated Flash

Here is a link to the Godox Speedlite that Alex showed us in class
Look here for another version available at Adorama


Some photographers who use off camera flash extensively:

Bruce Gilden Website

Instructions for using Canon Speedlite 580EX

 Instructions for using Canon Speedlite 600EX-RT

Wednesday, October 26, 2016

Assignment 8 Outdoor Strobe

1. Make a portrait where the person’s face and the background are the same exposure.
2. Make a portrait where the person’s face is exposed one stop under and the background is normally exposed.  Drop the power of the strobe by one stop keeping the f stop the same.

3. Make a portrait where the person’s face is normally exposed and the background is one stop under.

4. Make a portrait where the person’s face is normally exposed and the background is two stops under.

All four should be photographed in exactly the same place to make it easier to compare the results.

This is a test for your reference and should be laid out accordingly.

Print your f stop and shutter speeds.

Subject should be 2 or 3 stops darker than background.

Each group can share the results of doing the exercise once.